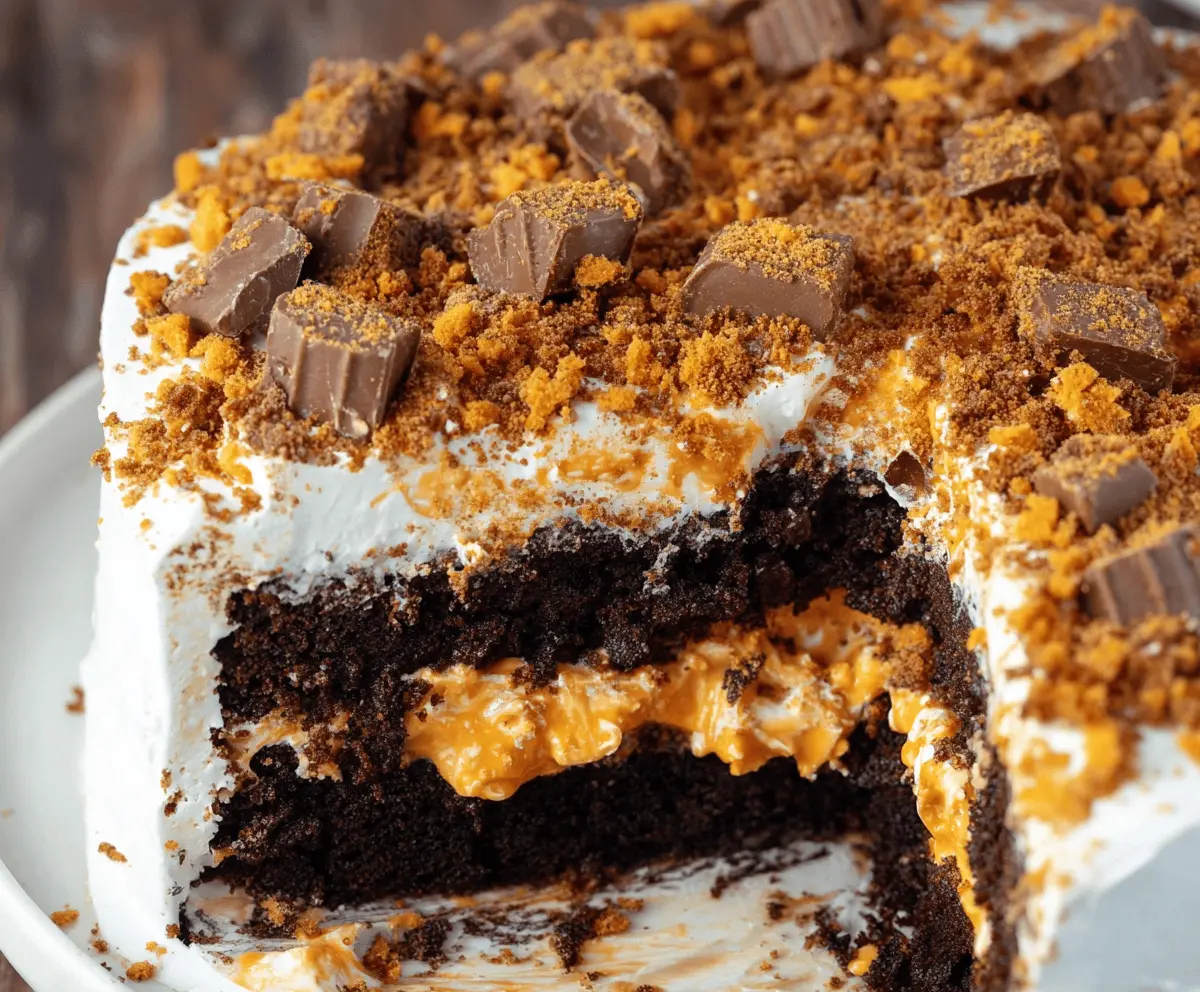
This Butterfinger Cake is a sweet treat that combines layers of fluffy cake with rich chocolate and crunchy Butterfinger bits. It’s like a candy bar in cake form!
I can’t resist sneaking a slice (or two) every time it’s made! Just imagine buttercream frosting and melted chocolate on top—yummy! 😋
Making this cake is easy, too! Just mix, bake, and pile on the delicious toppings. Perfect for parties or a cozy dessert night at home!
Key Ingredients & Substitutions
Chocolate Cake Mix: This is the base for your cake. If you want to make it from scratch, substitute it with your favorite homemade chocolate cake recipe. Boxed mixes are convenient, but homemade can add a personal touch!
Creamy Peanut Butter: Smooth peanut butter works best for the filling. If you’re allergic or prefer a different taste, try almond butter or sunflower seed butter as alternatives!
Cream Cheese: This adds richness to the filling. If you want to keep it lighter, you can use Greek yogurt instead, just be aware it may slightly change the flavor and texture.
Heavy Whipping Cream: Needed for the fluffy frosting. If you’re looking for a non-dairy option, coconut cream is a great substitute. Chill it first for the best results!
Butterfinger Candy Bars: These give the cake its signature flavor and crunch. Feel free to swap with another favorite candy like Reese’s or Snickers for a different twist.
How Do You Get the Filling to Be Fluffy and Smooth?
Mixing the filling properly is essential! After beating the peanut butter and cream cheese, gradually add powdered sugar. This prevents lumps. For the whipped cream, ensure your bowl is cold. Beat until stiff peaks form—this means the cream should hold its shape.
- Combine the whipped cream gently with the peanut butter mixture. Be careful not to deflate it; use a folding technique.
- Add the chopped Butterfinger last so the pieces remain choppy and don’t get over-mixed.
Making these adjustments will create a deliciously fluffy filling you’ll love!
How to Make Butterfinger Cake
Ingredients You’ll Need:
For the Cake:
- 1 box chocolate cake mix (plus ingredients called for on the box, usually eggs, oil, and water)
For the Peanut Butter Filling:
- 1 cup creamy peanut butter
- 4 oz cream cheese, softened
- 1 cup powdered sugar
For the Whipped Topping:
- 1 1/2 cups heavy whipping cream
- 1/4 cup granulated sugar
- 1 tsp vanilla extract
For the Garnish:
- 3-4 Butterfinger candy bars, chopped (reserve some pieces for topping)
- Additional crushed Butterfinger pieces for garnish
How Much Time Will You Need?
This delicious Butterfinger Cake will require about 20 minutes of prep time and about 30-35 minutes of baking time. Once baked, it needs to chill in the refrigerator for at least 2 hours. Total time: approximately 3 hours (including chilling time) before you can dig in!
Step-by-Step Instructions:
1. Prepare the Cake:
Start by preheating your oven as per the instructions on the cake mix box. Grease and prepare two 8-inch round cake pans. Pour the chocolate cake batter evenly into both pans and bake according to package directions. Once baked, allow the cakes to cool completely in the pans.
2. Make the Peanut Butter Filling:
While the cake cools, grab a medium bowl and beat the creamy peanut butter and softened cream cheese together until you have a smooth mixture. Gradually add the powdered sugar, mixing well until everything is combined and fluffy.
3. Whip the Cream:
In a separate chilled bowl, whip the heavy cream along with granulated sugar and vanilla extract until you reach stiff peaks. This means the cream should hold its shape very well when you lift the beaters out!
4. Combine the Filling:
Gently fold the whipped cream mixture into the peanut butter filling until it’s smooth and airy. Be gentle to keep the volume of the whipped cream. Toss in the chopped Butterfinger pieces and stir just until combined.
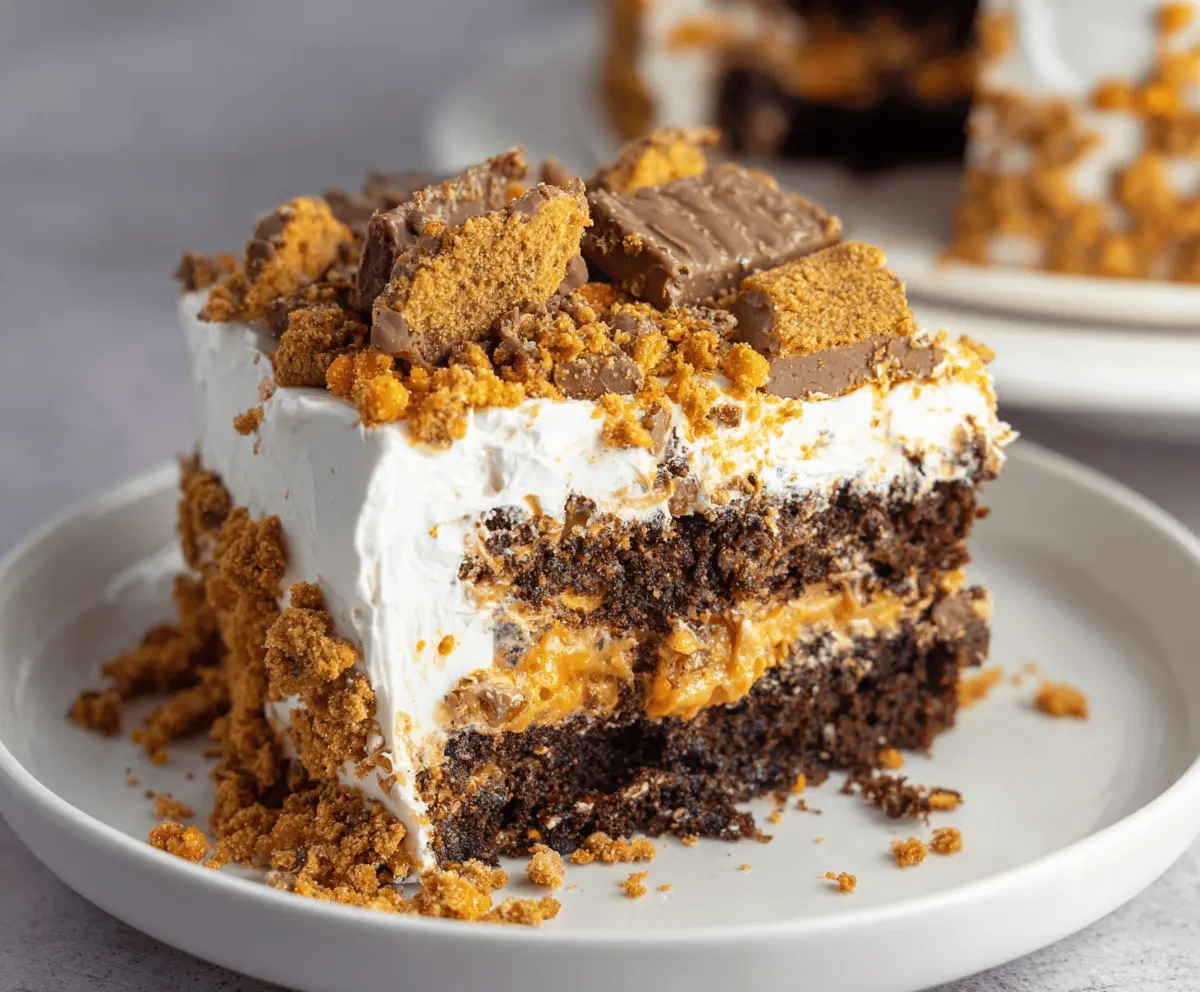
5. Assemble the Cake:
Once the cakes are completely cool, place one layer on your serving plate. Spread the peanut butter filling evenly over the top of this layer. Carefully place the second cake layer on top of the filling.
6. Frost the Cake:
Use the remaining whipped cream to frost the top and sides of the cake. Make it as smooth or as rustic as you like—just make sure it’s all covered!
7. Garnish and Chill:
Generously sprinkle the top with crushed Butterfinger pieces and any reserved chopped pieces for that extra special crunch. Finally, cover the cake and place it in the refrigerator to chill for at least 2 hours. This will allow all the flavors to meld beautifully.
8. Serve & Enjoy:
After chilling, slice up your Butterfinger Cake and serve it to your friends or family—or just keep it all for yourself. Enjoy each delicious bite!
This cake is an absolute delight with its rich chocolate layers and creamy peanut butter filling! Perfect for any occasion, or just because you deserve a little treat. 😊
Can I Use a Different Cake Flavor?
Absolutely! While chocolate pairs beautifully with peanut butter, feel free to substitute the chocolate cake mix with a vanilla or devil’s food cake mix for a different twist. Just keep in mind that the flavors will differ slightly!
Can I Make This Cake Gluten-Free?
Yes! Use a gluten-free chocolate cake mix instead of the regular one. Ensure that all other ingredients, like the powdered sugar and Butterfinger bars, are also gluten-free to maintain the integrity of the recipe.
How Should I Store Leftovers?
Store any leftover cake in an airtight container in the refrigerator for up to 3-4 days. To keep the cake fresh, it’s best to cover any cut sections with plastic wrap to prevent it from drying out.
Can I Freeze the Cake?
Yes, you can freeze the cake! Wrap it tightly in plastic wrap and then in aluminum foil to prevent freezer burn. It can be frozen for up to 2-3 months. Thaw it in the fridge overnight before serving.